Archive | February, 2013

Granite and backsplash choices: which would you do?

21 Feb

Granite and backsplash choices: which would you do?

So despite going into our renovation 100% certain on the direction we planned to go for our kitchen countertops, when the moment to officially commit, we stalled. To make a long story short, we’ve had sourcing issues on our preferred countertop and thus decided to look for an alternative. That sourcing issue has ultimately turned out to be a miscommunication, but we’ve now got two vastly different ideas and we’d love your opinion!

Our kitchen taste is what I would call classic but my mother apparently calls “milk toast,” so we feel that adding one element of real visual interest will make that item shine. The question is: should that shine come from the countertops themselves or a snazzy backsplash?

Choice 1: Super white quartzite with a snazzy backsplash

Super white is more classic and also less expensive than our other selection. The difference in cost means we would still have room in the budget for a fancy backsplash, and probably a design need for it anyway to spice up the room.

Super White Quartzite.

With our snazzy backsplash from New Ravenna (still not entirely sure of the color scheme, but this would be the pattern:


And the wildcard: Chatham New Ravenna in stone. The pattern sort of mirrors the lighting we'll have in the kitchen in a nice way.

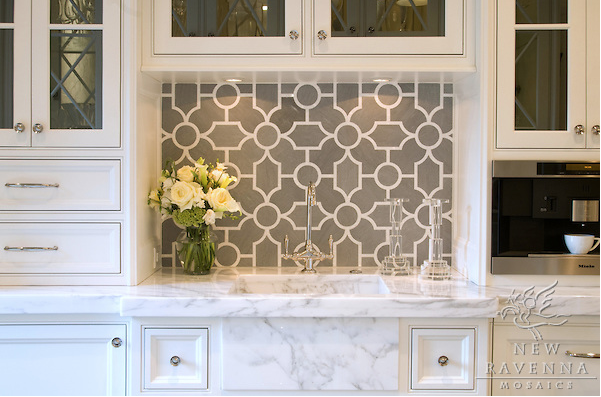
And the wildcard: Chatham New Ravenna in stone. The pattern sort of mirrors the lighting we’ll have in the kitchen in a nice way.


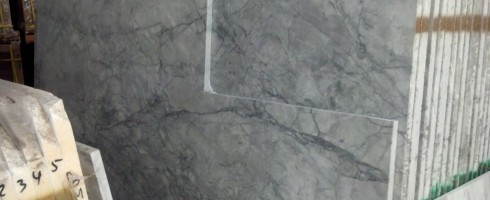
Choice 2: Fusion granite with white subway backsplash

The fusion granite is pretty wild and thus would need a really neutral surround to let it shine on its own (it’s also considerably more expensive, so not much room left for other options anyway). We therefore would opt for a subdued white subway surround. I’m posting the actual slab we saw plus a photo of a similar usage of fusion granite found on Houzz.

fusion granite smaller

Fusion granite: yellow barrier not included. This photo makes the grays appear rather blue, but the underlying color definitely leaned to the gray side.

Screen shot 2013-02-21 at 4.08.04 PM

Fusion granite in a white kitchen. Our backsplash would just be plain white subway.


So, what would you choose?


Tear down this (back) wall

8 Feb

Another busy week at the house!

First, the crew has finished removing the back wall on the parlor floor. The opening is huge and we can’t wait to see the doors and windows go in.  There will be a 9 foot wide window over the cabinets, and a 5 foot wide set of doors beyond the dining table with 17 inch high transom windows above both, so it will feel almost like an entire wall of glass.

Kitchen opening

Kitchen opening

We met with the contractor today to go over additional details on the back half of the parlor floor. There’s lots to fit in this space being shared by the kitchen and dining room, so we firmed up the cabinet depths, island and dining placement and the lighting fixtures. All of these details had previously been set by the architects, but now that we know exactly how much space we have to work with, we had to make a few minor adjustments here and there. Our contractor also brought over a sample cabinet for us to look at. He’ll be building custom cabinets for our space; it was great to see the quality of work that went into building it and to be able to make a couple of minor adjustments to the look.

IMG_9090

Sample cabinet

The HVAC system is mostly done and so there were also a few tweaks with the placement of the registers (where the air comes out). One area that will need a little more attention is the registers above the kitchen cabinets. While we are lucky to have 10′+ ceilings, it’s still a tight fit with the ductwork, the cabinets, hood and counter tops. We might have to adjust our crown moulding selection so things aren’t bumping into each other.

Duct work running into the kitchen

Duct work running into the kitchen

With the back wall gone and the new wall framed out, the plumbers were able to return and start working on the plumbing lines that run along the back of the house. This also includes them adding the drain and the water lines for the island prep sink which you can see marked out below.

Island placement

Island placement

The other big news of the week is that the walls have started to go up. After one final confirmation of the data and outlet locations, the sheetrock went up in the kids’ bedrooms, the office and the gym.

Space for gym

Space for gym

Office space

Office space

Kid bedroom

Kid bedroom

The last picture shows the challenge we have left with the center window splitting the two kids’ bedrooms. Originally we thought we would do a zig zag layout so that one bedroom would have an extra window and the other space would have more room but our architect suggested splitting the window with a fixed glass panel covering the portion of the window showing in each room. We still have to figure out how it’ll work with a shutter but the regular shape of the bedroom will make it easier to place furniture.

Next week we plan to file our updated plans with the city so that we can get our gas worked signed off. That’ll allow us to close up the bathroom walls and start tiling. There will also be more sheet rocking and more brick work on the back.